Arnold Palmer Layer Cake

I feel like even when I get into trouble with a recipe – be that forgetting an ingredient, messing up a cooking temperature or missing a step – I have enough creativity to get myself out of it. That said, last year for Fourth of July I attempted to make this Arnold Palmer cake from Momofuku Milk Bar’s Christina Tosi and it was an epic fail. It reminded me of the cake the three fairies try to make without magic in Sleeping Beauty (something like this). I tried to get by without a couple of key ingredients, but I could not resuscitate this thing. The cake was dry (the first major sin), my iced tea jelly was liquid (gasp), the mascarpone filling wouldn’t firm up and my almond tea crunch tasted like clumps of dirt. I still served it, because I had to have something to show for all of my surgical efforts, and my family was nice enough to grin their way through a slice.

Continue reading

Advertisement

Pink Lady Cupcakes

strawberrycupcak_5

When I’m presented with a fruity confection and a flourless chocolate cake on a dessert menu, I will almost always choose the latter. My attitude about dessert is, if I’m going to go for it, I want it to taste rich and satisfying. These cakes delighted me with how much flavor they had for what I might have considered a dainty dessert.

These cupcakes would be ideal for impressing a crowd at your friend’s baby shower. I’d pair them with lemon meringue cupcakes and just sit back and watch your guests swoon as they circle the cake stand. Conversely, they would satisfy the dessert craving of the rib eaters at your Fourth of July BBQ. I took them to a Memorial Day party and I wasn’t finished explaining what they were before two had been plucked from the box. If you want to make an impact with a dessert that is unexpected, flavorful and is completely doable at home (even for the boxed cake cook), this is it.

This recipe is originally a Smitten Kitchen cake recipe that Deb Perelman adapted from one of her favorite cookbooks, Sky High. She used it for a pretty princess birthday cake, which I’m sure would be fabulous, but I decided to make them into individual cakes. Ina Garten maintains that adults are just like children when it comes to desserts: they want their own and they don’t want to share. I’m inclined to agree. This isn’t to say I don’t love a great big slice of cake, but these just seemed appropriate for the Memorial Day potluck I was headed to. If you’re inclined to think these are a little too cutesy for mixed company, just know the depth of flavor really balances the girly factor. Some fruit cakes try too hard to be light that they can end up tasting like the whipped air version of the original fruit. But this cake and frosting combination is like that solid strawberry shake (the kind with little bits of berry still intact) that would make you return to the burger joint. It has a richness that fills the small space of a cupcake wrapper.

A word to the chef: this recipe is a departure from the usual cake baking process because it tells you to combine the butter with dry ingredients and strawberry puree, rather than creaming the butter and sugar first. I didn’t understand the reasoning behind this at first, and I’m not sure I do now, but it works. Just go with it. And listen to the warning from Perelman to resist eating the batter in its pre-baked stage, you may not be able to stop yourself from stealing more than one spoonful. The recipe calls for frozen strawberries, which is great to know because they are so accessible, but I used fresh strawberries and found the flavor was bright, and the color was vibrant.

A word on the icing. I’m a big fan of cream cheese icing, especially when you want to achieve that rich but light quality for a dessert. This frosting really exceeded my expectations because it was only slightly sweet and didn’t taste like it was made of butter. The layer of icing really didn’t overpower the airy strawberry flavor of the cake, and I think it’s because the recipe is heavy on the cream cheese and easy on the butter and confectioners sugar (relatively speaking of course). I piped this icing using a star tip, but you can also spread the frosting and top with sugary items that strike your fancy. For me those were the strawberry gummies at the grocery store checkout.

If you decide to make the cupcakes and transport them to your next party, I suggest investing in boxes like these so all your icing labor doesn’t go to waste. I bought a pack of 10 and I would buy them again because they have the cardboard cup holders, and just make anything you put in them look professional. Let’s face it, in cooking, as with many things in life, presentation is important.

strawberrycupcak_34
strawberrycupcak_18strawberrycupcak_25strawberrycupcak_16strawberrycupcak_6strawberrycupcak_4strawberrycupcak_47

Magic Beans

burgerasparagus_16burgerasparagus_27burgerasparagus_28I’ve read that chefs who can make a truly addictive vegetable dish that makes you want to forgo meat (that is, if you like meat in the first place) have a special kind of culinary imagination. Sure, anything you add bacon to is going to taste good, if not transcendent. But it’s what you can do without the duck fat, rib eye steak and fried chicken bits that can really set you apart. I’m starting to believe that more and more, especially when I come across dishes like this.

Last month my two sisters and our close friend went to Chicago together and had some memorable food experiences. They recapped almost every restaurant excursion for me, but the one dish they kept mentioning over phone, text and email was the Magic Beans at Top Chef Winner Stephanie Izard’s Girl & the Goat. Next on my vacation wish list is definitely a long, expensive food weekend in Chicago with stops at Alinea, Next, The Publican and of course, Girl & the Goat.  I considered not making these beans for about four seconds, in a fit of “you left me behind to have all this amazing food” rage, but I’m so glad I came back to reality. They were stop eating and steal the plate of beans good.

Essentially, these are blistered green beans cooked with shallots, tossed in a briny, soy, garlicky, crack-like sauce, then topped with aioli and toasted nuts. Now, if you didn’t read all that and immediately add green beans to your shopping list, please trust me on this one. But I warn you, serving these will draw attention away from whatever else is on the plate. I made sure to have our friend Lisa (one of the Chicago travelers) over to dinner the night I attempted these for the first time, to see if my re-creation was on point. She said they were just as magical, and the pile of beans was gone before we finished our turkey burgers.

Izard says to use cashews here, but I liked the look of slivered almonds with the beans, and I thought they complemented the flavors well. I had quite a bit of extra dressing and aioli, so I used the aioli later in the week as a dipping sauce for artichokes. I’m pretty sure it would make anything extremely addicting, so don’t let it go to waste.

1 lb green beans

1 shallot, sliced

cashews (or another nut if you prefer a different one, I used toasted almonds)

green bean dressing
yields 2 cups

4 oz. lemon juice (about three lemons)

5 oz. fish sauce

2 ½ oz. soy

1 tablespoon dijon

3/4 teaspoon sriracha

3 cloves garlic

4 oz. canola oil

aioli
yield: 1 cup

1/3 cup green bean dressing (from above)

1 cup mayonnaise

Blend lemon juice, fish sauce, soy, dijon and sriracha and garlic. Once smooth, pour in canola oil in a steady stream to emulsify.

Whisk together green bean dressing and mayonnaise to make aioli. Set aside.

Heat a couple of tablespoons of canola oil in a frying pan, just enough to coat the bottom. When the oil begins to shimmer, add the green beans. Toss for a minute or two, then add the shallots.

Once the skin of the beans has started to blister, add a half of a cup of the vinaigrette to the pan and let the beans steam until they are tender.

Transfer beans to a serving platter and top with toasted nuts. Drizzle with aioli and serve hot.

Source: Stephanie Izard

Topless Turkey Burgers

burgerasparagus_40 Tomorrow I am planning an epic day of cooking with my older sister. We have a list of freeze-capable recipes we are making for a friend, who is about to have twins and will most likely need a stockpile of meals. Because I don’t think we will be doing the traditional BBQ activities, I made these turkey burgers this week to put me in the festive mood for the Memorial Day weekend.

This first burger appearance on the blog is not meant to suggest that I always prefer turkey over a luxe combination of beef products. I’m a true lover of the beef burger arts. I don’t often make burgers at home, but when I do, I prefer turkey (insert Most Interesting Man in the World Meme).

I’ve made plenty of turkey burgers, meatballs and meatloaves in my day, and I’m keeping these burgers in my repertoire because they have the optimum levels of spice, heat and bite from the onions and garlic. They are awesome for a weeknight dinner, weekend BBQ and the patties freeze well when wrapped tightly in plastic. I used the 93 percent lean turkey because I think even turkey burgers need a bit of fat to be flavorful, but you could use the ultra lean stuff is you like. I also used whole spices that I ground with a mortar and pestle first, a step that may seem fussy but I think adds much more smokey flavor. I like to chop all of the burger-enhancing ingredients in a food processor, because I like how the onions, garlic, peppers and spices become so fine that they blend into the patty. No big chunks of onions here. You can of course chop these ingredients by hand, just make sure to take a little extra time to make the pieces very small.

For toppings, I use a fat-free black bean dip from Trader Joe’s, red onion, sliced tomato and arugula. I really like how the tangy bean dip compliments the smoky spices and cilantro, and also adds some moisture to the final product (since turkey burgers have a tendency to become dry). These burgers would also be great with some pickled red onions, avocado and chopped spinach. Enjoy the long weekend!

Topless Turkey Burgers

Adapted from Bon Appetit Spicy Turkey Burger recipe

Makes about 6 patties

1 ½ lbs ground turkey

1/2 cup minced onion

1/4 cup chopped fresh cilantro

2 minced garlic cloves

2 teaspoons chopped jalapeño or serrano chile with seeds

1 teaspoon ground coriander

1 teaspoon ground cumin

1 teaspoon paprika

1/2 teaspoon freshly ground black pepper

Kosher salt

Extras:

6 mini whole wheat pitas

Fat-free black bean dip

Red onion, sliced

Tomato, sliced

Arugula

Combine onion, garlic,  jalapeño or serrano chile, cilantro, coriander, cumin, paprika, and black pepper in a food processor. Pulse until the onions are finely chopped and the ingredients are incorporated.

Add the vegetable and spice mixture to a bowl with the ground turkey and use a fork to combine.

Form into patties about the size of your palm. Season with salt and pepper.

Grill patties over medium-high heat for about 5-7 minutes per side, until they are cooked through.

To finish the burgers, lightly toast the mini pitas and spread a tablespoon of black bean dip on each one. Place a burger patty on each pita, and top with red onion, tomato and arugula. Serve immediately.

Turkey Burger spicesTurkey burger onionsburgerasparagus_39-CLOSE

Blackberry Mascarpone Tart

At least once a month, usually in the midst of a not so great work day, I get the overwhelming urge to feel sorry for myself that I’m not in Paris. Eating ham and cheese baguettes. Wearing a scarf. Sipping wine in a properly manicured garden. Generally absorbing Frenchness.

This past weekend, I tried to use that specific self pity for a good cause: a tart. I decided to get some inspiration for my tart quest by spending the better part of an evening reading Thomas Keller’s Bouchon Bakery cookbook with the intensity of a tween reading Twilight. If you have never thumbed through one of his books, please do yourself a favor and do it. Even if you just go to Barnes and Noble and skim it quickly, pretending like you intend to purchase. He has such a gift for making OCD-ish technical skill look effortless in photographs and in his food. I was so amped that I felt like I could just buy the nice butter from Whole Foods and whip up a batch of almond croissants right in my very home (something I know I must attempt someday, but for now, a tart must do). He shares excellent advice that is just as applicable to home cooks as it is to the professionals in his kitchen: make working clean your philosophy, practice making the same recipe over and over to “become attuned to the nuances of the way the ingredients behave,” and you CAN make Nutter Butters into a sophisticated treat. Maybe the last one isn’t as universally valued, but still excellent advice.

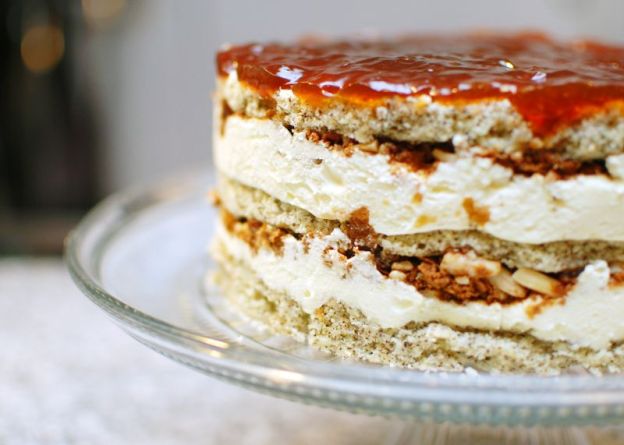
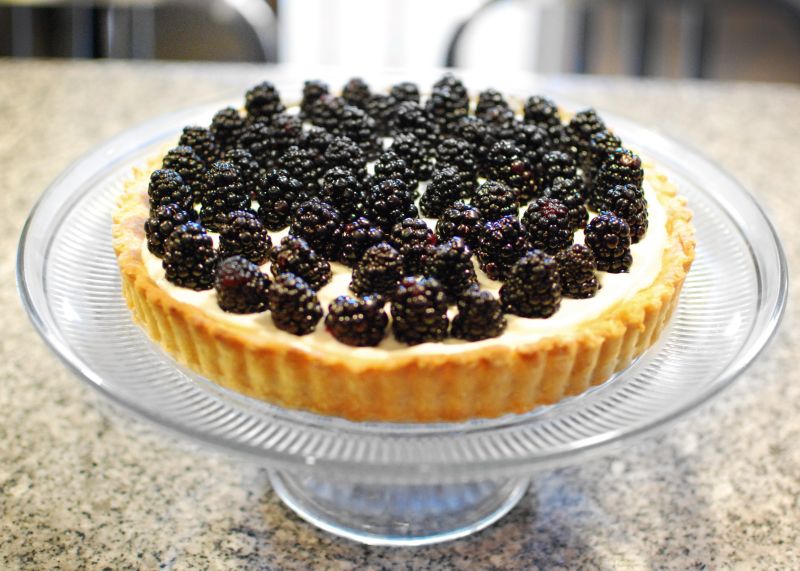
My younger sister made this blackberry tart recipe for our family a year ago and it’s been one of my favorites ever since. I chose to use a different tart dough method, which came from a French cooking instructor and turned out to be a far more elegant preparation. The recipe tells you to combine heated butter with flour for a hot, pliable mixture. This is a departure from a traditional tart recipe that asks you to work bits of cold butter into flour, chill the dough and then roll it out into a tart mold. However, the result was the same flaky crust you expect from the chilled version, but in less time and with much less flour on the counter. I’ve doubled the recipe in the instructions below because the original recipe didn’t fill out the 9-inch tart pan completely.

The buttery crust, tangy filling and fresh berries make this dessert well balanced and surprisingly light. Now, I would love to say that I just happened to be strolling the farmers market in Santa Monica on Saturday, and I just stumbled upon the most ripe, photo-ready blackberries. But, in the spirit of being honest, I have to say I got them at Trader Joe’s and I had no guilt about it once I tasted the finished product. If the lack of farmers market berries is what would hold you back from making this, just give it a try. The tart also doubles as a decadent weekend breakfast with morning with coffee. Here’s to Paris!

French Tart Dough from Dave Lebovitz (recipe already doubled below):

6 ounces unsalted butter, cut into pieces

2 tablespoon vegetable oil

6 tablespoons water

2 tablespoon sugar

1/4 teaspoon salt

10 oz, or 1 slightly-rounded cup, flour

Filling:

2/3 cup mascarpone cheese

1/2 cup sour cream

1/3 cup honey

1/2 tsp. vanilla extract

Pinch ground nutmeg

Topping:

Fresh blackberries (about 12 oz.)

Instructions:

Preheat the oven to 410 degrees.

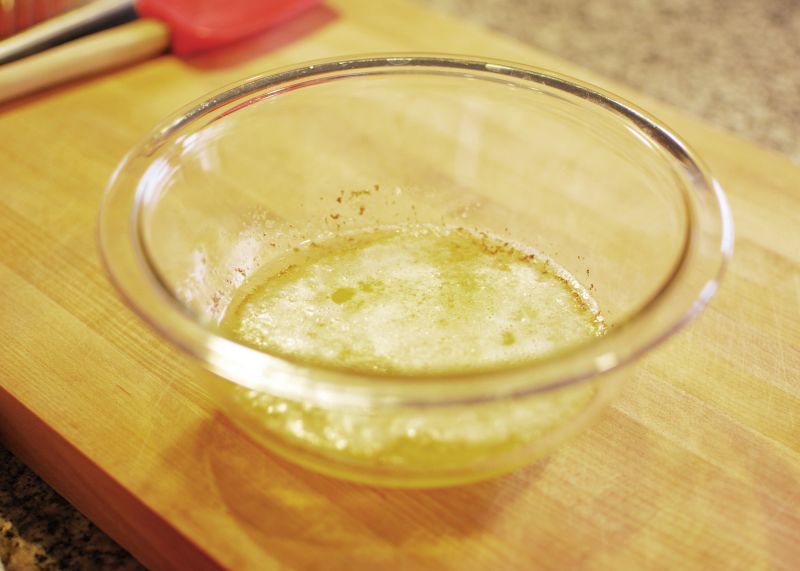
Combine butter, oil, water, sugar and salt in a ovenproof bowl, such as a Pyrex. Heat the mixture in the oven for about 15 minutes, until the butter begins to bubble and turn brown.blackberrytart_3

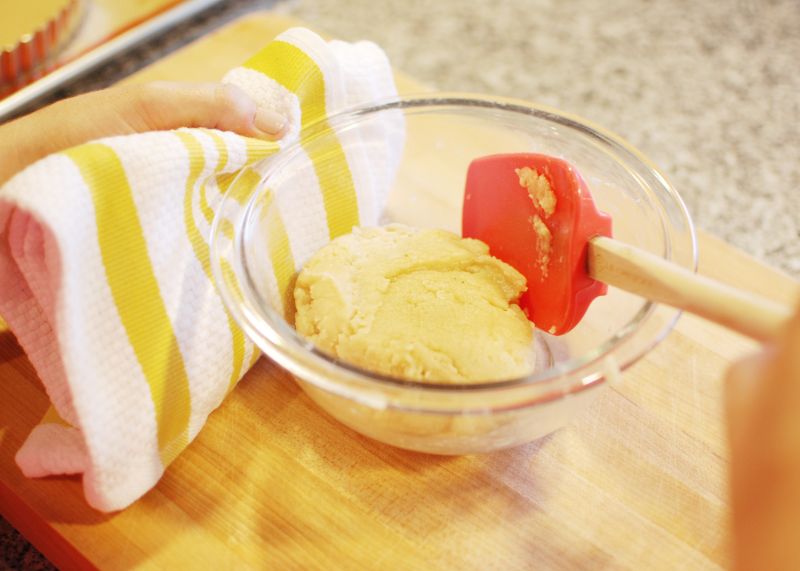
Carefully remove the bowl from the oven (it will be very hot) and quickly stir in the flour until it becomes a ball of dough that pulls away from the sides of the bowl.blackberrytart_11

Transfer dough to a 9-inch tart pan. When the dough is cool enough to handle, press it into the shell and up the sides of the pan to create a crust. Use a fork to pierce the bottom of the tart dough. There may be holes in the crust after baking, so reserve a small piece of dough to fill in any cracks.blackberrytart_20

Bake the tart crust for 15-20 minutes until it’s golden brown. Transfer to a wire rack and let cool completely.

Meanwhile, combine the mascarpone, sour cream, honey, vanilla extract and nutmeg in the bowl of a stand mixer fitted with a whisk attachment. Beat until smooth.

Spread the filling evenly in the cooled tart shell. Top with berries in a circular pattern. Chill for about an hour before serving.

blackberrytart_finishedSource: Adapted from Annie’s Eats

Wild Rice, Kale and Caramelized Onion Gratin

finishedgratin

I’ve had a bit of a love affair with this copper gratin dish because it’s unlike any of my other kitchen equipment. I have some great pans and knives, but nothing that feels as authentic as this dish. My boyfriend’s mom brought it back from a trip to Europe and she gifted it to him a couple of years ago. I often walk by it hanging on the metal kitchen rack and think that I should whip up some classic, Julia Child-inspired French dish, like Sole Meuniere. Even though it doesn’t have the built-in flavor of a cast iron pan that has been passed down from previous generations, I imagine it has a rich history in a French farmhouse kitchen.

This past Sunday, for our Mother’s Day feast, I thought it would be the perfect dish for a gratin I’d be eyeing in my Smitten Kitchen cookbook. My mom and dad really love almost anything I cook (in true supportive parent fashion) but I think that they went a little nuts over this one partly because my dad has loves anything with rice, and my mom gets very excited when you let her know gratin is in her future.

I used to think (up until this week) a gratin was really just a more sophisticated French-style casserole. But I have since learned that a gratin is specifically baked in a shallow round or oval dish to achieve more surface area for a buttery, breadcrumb topping. I loved this particular version because you get all the nutty, crunchy cheesy bits of a mac and cheese or creamy cauliflower gratin, but the wild rice mixture is lighter. The caramelized onions really make the dish in my opinion, because they give that sweet/savory flavor and bring out only the best parts of the kale (which sometimes I think can take on that stinky cabbage quality if it isn’t cooked right). I know Smitten says to use Emmentaler or Baby Swiss cheese, but even the rich grocery store I went to didn’t carry it. I used Gruyere, a fine substitute and a common choice for other gratin dishes, and I think it worked out just perfectly. The finished, bubbly gratin was a great side dish set on a rustic table with the Chicken Milanese I also made.

Try not to be deterred from making this because of the nearly one hour cooking time for the rice. It does take a while, but it’s well worth it. You could even make it a day ahead, assemble and refrigerate the dish. One other thing to note, the recipe says it serves 10-12, but I really think it serves more like eight people.

Kale

caramelizedonions

kalepan

scoopgratin

gratinplateWild Rice Gratin with Kale, Caramelized Onions and Baby Swiss

From The Smitten Kitchen Cookbook by Deb Perelman

Serves 10-12 as a side dish

Ingredients

Rice:

5 cups cooked wild rice (about 1 2/3 cups uncooked)

Caramelized Onions:

1 Tbs butter

1 Tbs olive oil

2 large sweet onions, halved and thinly sliced

4 cups stemmed kale leaves cut into ribbons

1/2 tsp salt

black pepper to taste

Assembly Ingredients:

2 cups grated Emmentaler or Baby Swiss cheese (I used Gruyere)

2 Tbs unsalted butter (1 Tbs to grease the baking dish, 1 Tbs melted for breadcrumbs)

3/4 cup chicken or vegetable broth

1 cup dry breadcrumbs

salt and pepper to taste

Instructions

Cook the rice according to package directions.

Preheat the oven to 375 degrees.

Meanwhile, caramelize the onions. Heat the butter and olive oil in a large, heavy skillet over medium-low heat. Add onions, sprinkle with salt and a little pepper, and cook until they’re tender and sweet, stirring occasionally, about 30 minutes. Add the kale ribbons, and cook until they wilt a bit, about 5 minutes. Stir together the onion-kale mixture, wild rice, and 1 cup grated cheese in a large bowl. Season to taste with additional salt and pepper, if needed.

Assemble the gratin. Use 1 tablespoon butter to generously coat a 2-quart baking dish. Spread the wild-rice mixture into prepared gratin and pour broth over it. Sprinkle remaining cheese over gratin. Toss breadcrumbs with 1 tablespoon melted butter and salt and pepper to taste; sprinkle over cheese.

Bake for 30 to 35 minutes, or until a little bubbly and beginning to brown on top.

Lemon Meringue Cupcakes

Lemon Meringue Cupakes on StandThese cupcakes are the epitome of the season – or lack thereof – in L.A. at the moment. They are bright, airy and just cheerful as hell. I also love that they are still delicious, but don’t have that thick layer of buttercream that normally makes cupcakes so decadent. I’m a huge fan of lemon, whether it’s in desserts, chicken or sparkling water, so I love that these almost give you that pucker feeling when you bite in. These will definitely make my list of go-to cupcake recipes (because everyone should have one of those, right?).

I fully intended to set these under the broiler for a few seconds to get that toasted marshmallow look, but quickly discovered that I needed (read wanted) a kitchen torch. I really don’t regret this decision because I was able to strategically toast the piped meringue to my liking. I also enjoyed how when I called my baking-prodigy little sister to rationalize my purchase, she quickly responded with something like, “Well we can always use it for the marshmallows on S’mores cupcakes.” That’s why she is my sister.

Lemon Meringue Cupcake w Torch
Lemon Meringue Cupcake
You could substitute a jarred version of the lemon curd, and I wouldn’t judge you for it, but it’s quite simple to make. I also think it just has that extra punch of lemon when you make it fresh at home. And don’t you want the full credit for creating something so sunny?                           Score one for Martha, yet again.

Source: Martha Stewart

Fresh fish en papillote

bakedfish_7

A clean, citrus-infused piece of white fish is now what I crave on an evening when I want to feel not just fed, but nourished. I discovered a version of this meal while doing an 8-week workout challenge with a group of friends at the office, and gravitated towards the two major ingredients: lemon and ginger. I’ve tended to avoid baking fish at home because I always think it’s going to make our modest apartment smell like a Red Lobster (no offense to the home of fried fish). However, I took the time to make an extra stop at our local Santa Monica Seafood to get something that was actually fresh and I think that’s the key to a fishy-smell-free kitchen. That day it was Pacific Rockfish, but just go with anything that is wild caught and hasn’t been frozen.

I also love this dish because it’s so simple to assemble, and yet comes out looking very impressive for guests. ( I’ll take any chance I can get to look like a culinary sage when I’ve spent less than an hour moving around the kitchen primarily focused on drinking pre-dinner wine) You can transfer the pouches straight onto plates and let your diners open them to get that initial waft of citrus and herb. It’s also pretty difficult to overcook since the fish gently steams in the pouch. I’ve definitely left it in the oven for a few extra minutes and no one has been the wiser.

You could opt out of the potatoes in favor of less starchy vegetables, but I like to make a few extra to soak up the fresh, bright broth that develops in the parchment. It’s very important that you use parchment paper, rather than foil, for recipes like this one that include acidic ingredients. Though I haven’t tried it, I’m told combining foil with ingredients like lemons, tomatoes or white wine will create a really bad taste. I’ll take their word for it.

bakedfish_2

bakedfish_4bakedfish_5bakedfish_6

Baked Lemon-Ginger Fish in Parchment

Serves 2

2 cups spinach

1 shallot, thinly sliced

6 small red potatoes

Two filets of fresh white fish

1 Tbs ginger, grated

Juice of one lemon, extra slices for garnish

1/4 cup parsley, chopped

2 Tbs extra virgin olive oil

Salt and pepper to taste

1. Cut two pieces of parchment paper, fold in half vertically and place on a baking sheet. Spray the inside of the parchment pouch with cooking spray. The folded piece of parchment should cover about half the size of a half-sheet pan.

2. Boil potatoes until fork tender. Once cool enough to handle, cut them into slices and set aside.

3. Combine grated ginger, lemon juice, olive oil and parsley in a small bowl. Add a pinch of salt and pepper. It will look thick, almost like a pesto.

4. Layer spinach, sliced potatoes and sliced shallot onto one side of a piece of parchment. Sprinkle with salt and pepper.

5. Season one side of the fish with salt and pepper, then lay on the bed of vegetables. Spoon half of the lemon-ginger-parsley mixture over the fish and top with a slice of lemon.

6. Starting at one side and working towards the other, roll and pinch the edges of the parchment paper together. Twist both ends of the pouch tightly so that the final pouch looks like a paper calzone. Repeat with the second piece of fish.

7. Bake pouches on a sheet pan at 400 degrees for 10-12 minutes. Open and serve immediately.

Source: Adapted from Gunnar Challenge nutrition plan.

Chicken Marbella

chickenwitholive_2

I consistently reach for the big bowl of lemons on my counter and a handful of herbs whenever I decide on a “something chicken” dinner. Even though these components are simple, they are always the most satisfying to me. That is, until I tried Chicken Marbella.

This dish comes from Sheila Lukin’s iconic Silver Palate cookbook, and develops such a complexity with minimal effort. Lukin began incorporating Mediterranean flavors into her food when she started a catering business in the late 1970s. She then opened The Silver Palate food shop in New York Chicken Marbella was one of the first main dishes served at the shop.  See the full recipe here.

I was introduced to this dish a couple of years ago at a friend’s bachelorette weekend in Lake Tahoe. My friend’s sister marched into the cabin with about four Ziploc bags of  chicken parts marinating in olives, prunes, capers, garlic and spices. I hovered in the kitchen and watched as she added white wine and brown sugar to trays of chicken in the oven. The result was tender chicken in this unique, briny sauce complemented by the candy-like prunes. She spooned the chicken over herb cous cous and I have not forgotten it since.

To recreate this dish in a shorter amount of time on a weeknight, I used two pounds of boneless, skinless chicken breasts. I’m normally all for the amplified flavor of bone-in, skin-on cuts of chicken, but for a quicker version this worked splendidly. The key with Chicken Marbella (and I can’t stress this enough) is to marinate overnight. Trust me on this one, you don’t want to shortchange yourself.

Note: If you opt for the boneless version, cooking will take about 30 minutes less. Just make sure the chicken’s internal temperature reads 165 degrees on a meat thermometer.

Cheese and Onion Sandwiches

Cheese and onion sandwiches pair well with a cold beer.

I never thought my family had a food history. We don’t have a secret to crispy fried chicken, or a BBQ rib technique that has been passed down through the generations. We don’t even have a blue-ribbon pie recipe. Even though some of my most vivid food memories have happened with my family where we all started, the Midwest, my grandmother hasn’t bestowed upon me a greasy piece of paper scribbled with the secret to the world’s greatest anything.

As you can imagine I was feeling quite sorry for myself. But when I  started a list of the things I know (that didn’t come from an episode of Barefoot Contessa) I found some forgotten gems. So to kick things off, it’s my dad’s favorite sandwich that my Grandmother Mary used to make just for him.

She whipped up a spread of just three things: onions, cheddar and mayonnaise. He tells me, I swear with a glint in his eye, she used to slather pumpernickel bread (his favorite) with this pungent spread and cut the sandwiches into threes. He flew to Wales for his dental school residency on Laker Airways and she sent him off with a little piece of home in the form of 11 (yes) cheese and onion sandwiches stacked into a bread bag. They were gone when he landed.

I found them to be simple, but insanely addictive because of the sharpness of the spread. They went best with a pickle, a cold IPA and an episode of Mad Men.

Grandmother Mary’s Cheese and Onion Sandwiches

Ingredients

8 slices pumpernickel bread

1/2 cup chopped red onion

1 cup sharp cheddar cheese, shredded

1/2 cup mayonnaise

salt and pepper to taste

1. Mix chopped onion, mayonnaise and shredded cheese in a large mixing bowl. Chill for 15 minutes.

2. Spread on slices of pumpernickel bread. Enjoy!

cheesedips_11

Shred cheese yourself. Pre-shredded cheddar is always too dried out and lacks flavor.

cheesedips_24

Chop red onion into a small dice.

Pumpernickel bread was key because it countered the sharp flavors.

Pumpernickel bread was key because it countered the sharp flavors.